How Structure Data Can Double Your Article Visibility
A step-by-step guide to mastering Article Schema

As a writer, hitting "Publish" is only half the battle. In a digital landscape crowded with millions of new posts every day, the real challenge is making sure search engines like Google don’t just find your work, but truly understand it. If you have ever noticed certain articles appearing in Google’s coveted "Top Stories" carousel, or showing up with an author's name and precise publication date directly in the search results, you have seen Article Schema in action.
This hidden layer of code is the difference between Google treating your content as a generic blob of text and recognizing it as a professional, authoritative journalistic piece.
Why Writers Need to Care About Structured Data
Search engines are incredibly intelligent, but they still appreciate a clear roadmap. Structured Data (specifically in the JSON-LD format recommended by Google) provides that roadmap. By explicitly telling Google who wrote the piece, when it was last modified, and providing a concise description, you unlock specific "Search Enhancements" that plain text cannot achieve.
The Real SEO Benefits:
Eligibility for Rich Results: This includes larger thumbnail images in search results and the possibility of appearing in the "Top Stories" carousel, which can radically increase traffic.
Establishing EEAT: "Experience, Expertise, Authoritativeness, and Trustworthiness" is Google's core framework for evaluating content. Article Schema formally links your content to your author profile and publishing organization, directly boosting these signals.
Improved Freshness Signals: By utilizing the dateModified property, you can tell Google exactly when you last updated your content, signaling that it is current and relevant.
Step-by-Step Guide to Implementing Article Schema
Many writers are intimidated by technical SEO, assuming it requires advanced coding knowledge. However, modern workflows have simplified this process. Instead of manually scripting JSON-LD, you can generate article structured data tags by simply filling out a structured form. This method handles the formatting and syntax, leaving you with a clean block of code ready for implementation.
Here is exactly how to utilize a standard generator to optimize your articles, broken down by section.
Step 1: Inputting Basic Article Metadata
The first phase of the process is providing the core identifiers for your content.
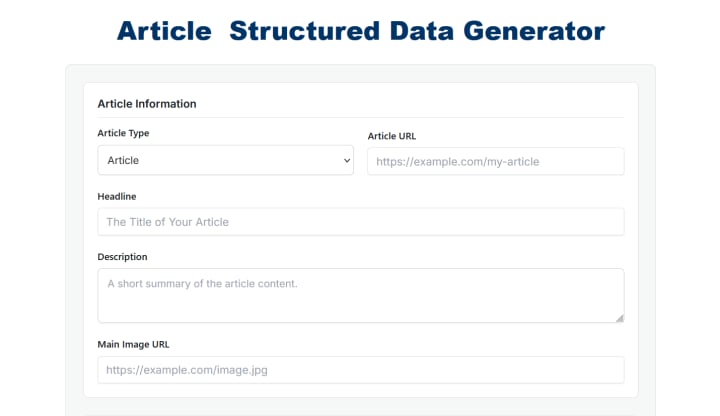
The initial setup fields for core article information.
When you review Image 1, you will see five essential fields that must be populated accurately:
Article Type: (Visible in the dropdown as 'Article'). For most written content on platforms like Vocal, "Article" is the correct, safest choice. You would only select "NewsArticle" if you are a recognized news organization, or "BlogPosting" for less formal personal blogs.
Article URL: This must be the canonical URL—the specific, primary web address where the article is published.
Headline: While your on-page title might be longer, your Schema headline should be punchy and fit within roughly 110 characters, as this is what Google may display in rich results.
Description: This is your elevator pitch. Summarize the core value of the article in 150–160 characters.
Main Image URL: Provide the direct link to your primary feature image. Google uses this for the large visual previews in the "Top Stories" carousel.
Step 2: Establishing Authority and Timestamps
Once the content is defined, you must tell Google who created it and when it was created. This is crucial for establishing EEAT and freshness.

The fields for defining Author/Publisher details and managing dates.
As illustrated in Image 2, you must move to the specialized detail sections:
Author Name: Use the exact pen name or real name you publish under.
Author URL (Optional but Recommended): This is vital for EEAT. Link to your Vocal profile page, your personal portfolio website, or your professional LinkedIn profile. This helps Google connect this article to your established expertise across the web.
Publisher Name: If you are an independent creator, this can be your name again. If you are writing for a specific publication, enter its name here.
Dates: This section is non-negotiable for professional visibility.
Date Published: Use the provided calendar tool (or click "Now") to set the precise time the article first went live.
Date Modified: This is often overlooked. If you update your article six months later with new statistics or a new conclusion, update this date. Google uses this to verify content freshness, which is a significant ranking factor.
Step 3: Extracting and Implementing the Code
Once you have filled in all the parameters shown in Images 1 and 2, the tool automatically constructs the complex JSON-LD script for you.
You can see the final result at the bottom of Image 2 under "Generated JSON-LD Structured Data." Simply click the prominent blue "Copy" button to copy the entire script to your clipboard.
How to Install and Test Your New Schema
Now that you have the code, you need to add it to your website.
Paste the Code: You must paste this entire script into the <head> section of your article's HTML. Most content management systems (CMS) and platforms (like WordPress) have a "Header and Footer" plugin or a dedicated field for "Custom Meta Tags" where you can drop this code without touching core theme files.
Validate the Implementation: Social media and Google are picky about code syntax. Before you announce your newly optimized article, use Google's official Rich Results Test tool. Paste your article’s URL or the code snippet directly into the validator. If the code is correct, Google will give you a green checkmark and explicitly state: "Article detected."
Final Thoughts
Great writing deserves to be seen. By spending five extra minutes on your technical SEO during the publication process, you ensure that search engines treat your articles with the same level of professional detail that you put into writing them. Start auditing your top-performing articles today and see how rich results can revitalize your traffic.
Join Bansidhar on Peerlist!
Join amazing folks like Bansidhar and thousands of other builders on Peerlist.
0
2
0