How to Build a Landing Page with AI
A step-by-step guide for marketers, founders, and creators who want a live landing page without touching a terminal.
Most people who want a landing page hit the same wall.
They either have to learn web development, hire a developer, or spend hours wrestling with a drag-and-drop builder that never quite does what they want. The result? The idea sits in a doc somewhere, unlaunched.
Here's the thing: that wall no longer exists.
This guide walks you through how to build a complete, responsive landing page from scratch — even if you have never written a line of code in your life.
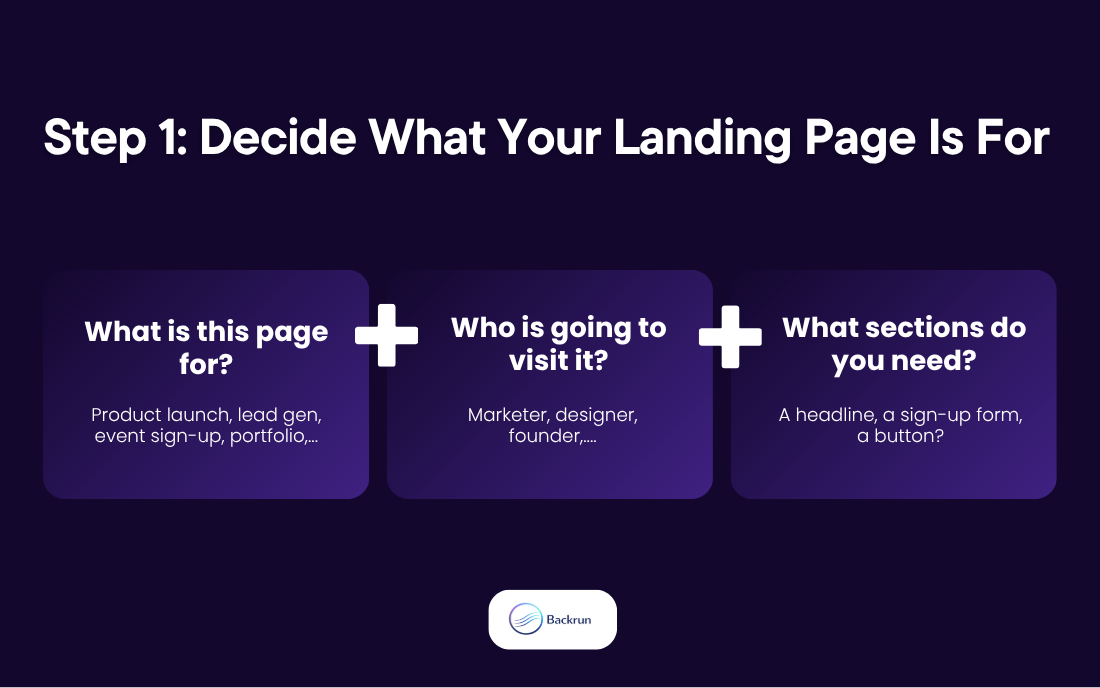
Step 1: Decide What Your Landing Page Is For
Before opening any tool, spend two minutes answering these questions:
What is this page for? (product launch, lead gen, event sign-up, portfolio)
Who is going to visit it?
What is the one action you want them to take?
What sections do you need? (headline, features, testimonials, a button?)
A rough idea is enough. You do not need a perfect plan — the AI will help you fill in the gaps.
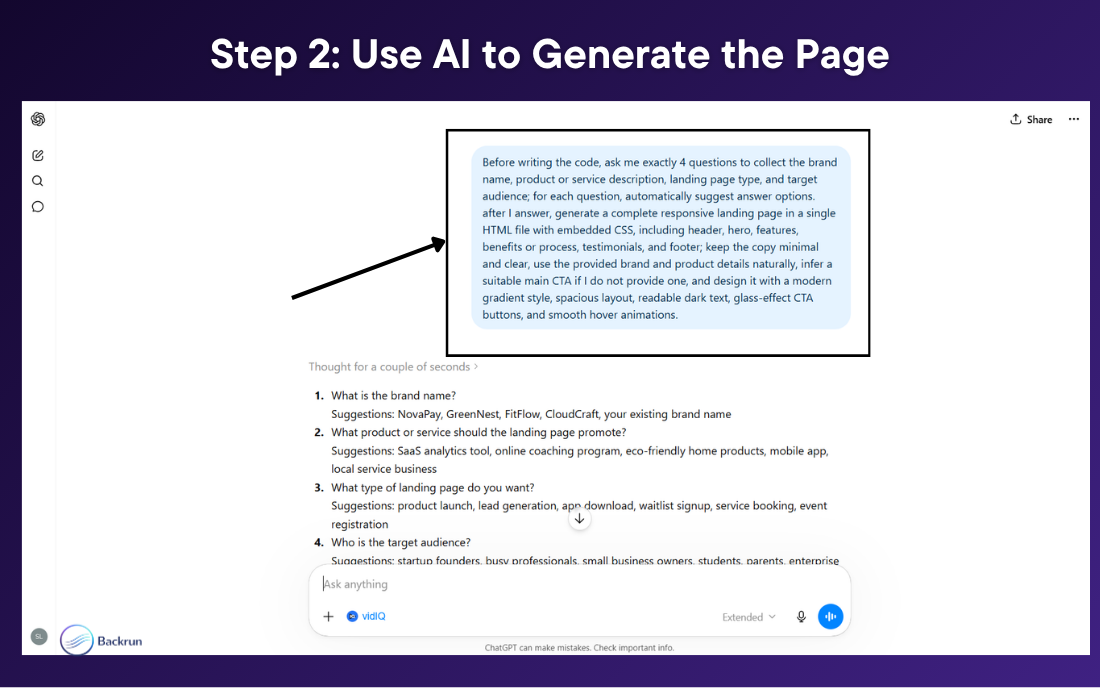
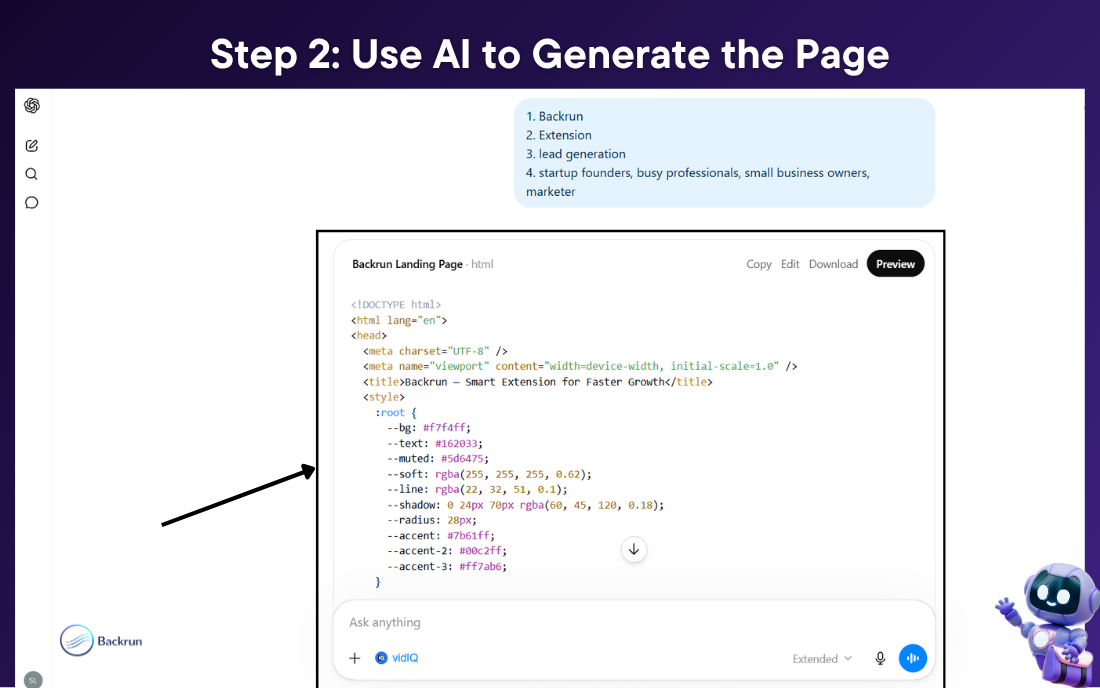
Step 2: Use AI to Generate the Page
This is the part that surprises most people. You describe your page in plain English, and the AI writes all the code for you. No technical knowledge required.
Open ChatGPT, Claude, or Gemini and use this prompt:
"Before writing the code, ask me exactly 4 questions to collect the brand name, product or service description, landing page type, and target audience. For each question, automatically suggest answer options. After I answer, generate a complete responsive landing page in a single HTML file with embedded CSS, including header, hero, features, benefits, testimonials, and footer. Keep the copy minimal and clear. Use a modern gradient style, spacious layout, readable dark text, glass-effect CTA buttons, and smooth hover animations."
The AI will ask you 4 short questions, then generate a full HTML page in seconds.
A few things that improve the output:
Ask for everything in one HTML file — this keeps deployment simple later
Request mobile responsive design explicitly
If a section looks off, describe the problem in plain language and ask for a fix — the AI will regenerate just that part
Claude tends to produce especially clean, well-structured HTML for this kind of task. ChatGPT and Gemini both work well too. Use whichever you already have open.
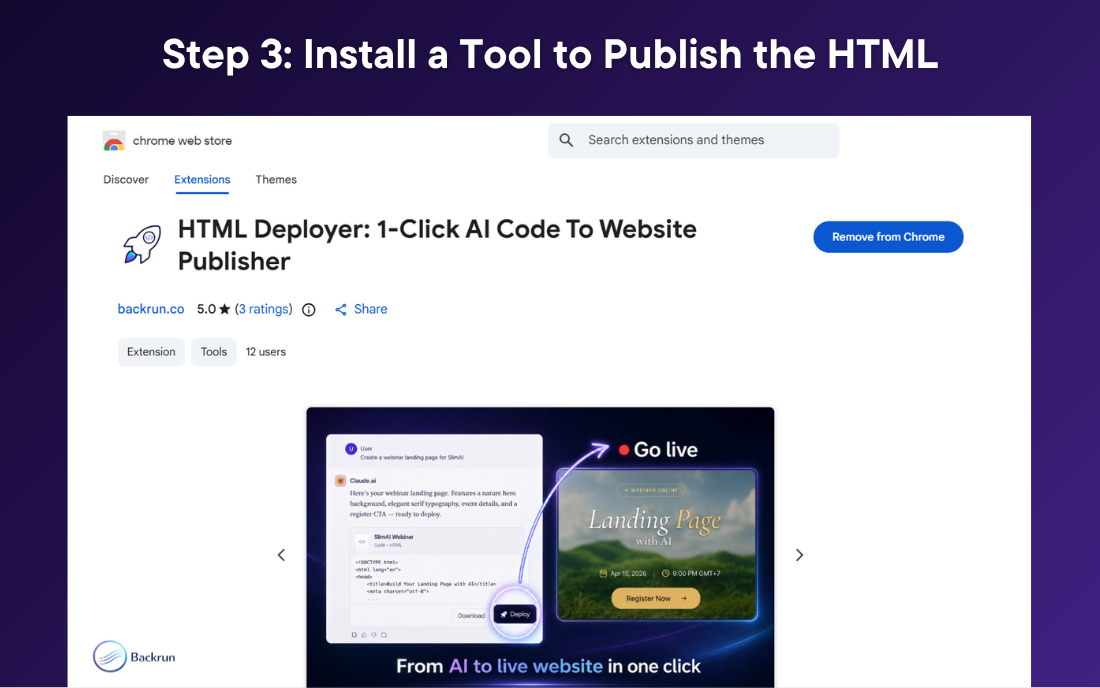
Step 3: Install a Tool to Publish the HTML
Once the page looks good, you need to put it online.
This is where most people get stuck. Hosting sounds technical — and it usually is. Normally you'd need to manage files, configure a hosting provider, or learn a deployment tool.
A simpler option is to use a browser extension called HTML Deployer.
The idea is straightforward: the AI creates the HTML, and HTML Deployer puts it online — directly from the browser tab where you're already working.
To get started:
Open the Chrome Web Store
Search for HTML Deployer
Add the extension to Chrome
Go back to your AI chat and refresh the page
That's it. You're ready to preview and deploy.
Step 4: Preview Your Page on All Devices
After installing the extension, return to the AI chat where your HTML code is sitting. HTML Deployer scans the page automatically, detects the code block, and loads it into a preview panel — no copying or pasting required.
You'll see your landing page rendered live across desktop, tablet, and mobile screen sizes.
This step matters even if the AI output looks good in the chat. Layout issues are common on mobile — a button might overflow, a headline might be cut off, a section might stack incorrectly on a small screen. The preview lets you catch these before anyone else sees them.
If something doesn't look right, go back to the AI and describe the problem:
"The CTA button on mobile is overflowing outside its container. Make it full-width on screens below 768px."
The AI generates updated code. HTML Deployer detects the new version automatically. Keep iterating until the page looks exactly how you want.
Step 5: Publish and Get Your Live URL
When the page looks right, choose where to publish inside the HTML Deployer panel:
Netlify — The easiest starting point. Free, gives you a real HTTPS URL, no account setup needed in advance. Start here if you have never hosted anything before.
GitHub Pages — Good if you already have a GitHub account and want your files version-controlled.
FTP Hosting — The right option if you already have a hosting account through a provider like Namecheap, Bluehost, or SiteGround. Enter your FTP credentials and the extension uploads the file directly — no FileZilla, no cPanel.
ZIP Download — If you'd prefer to upload manually, this exports a clean package you can take anywhere.
Click Deploy to Host. The extension handles the upload and returns a live URL in under 10 seconds. A QR code is generated automatically — useful for events, presentations, or sharing on social.
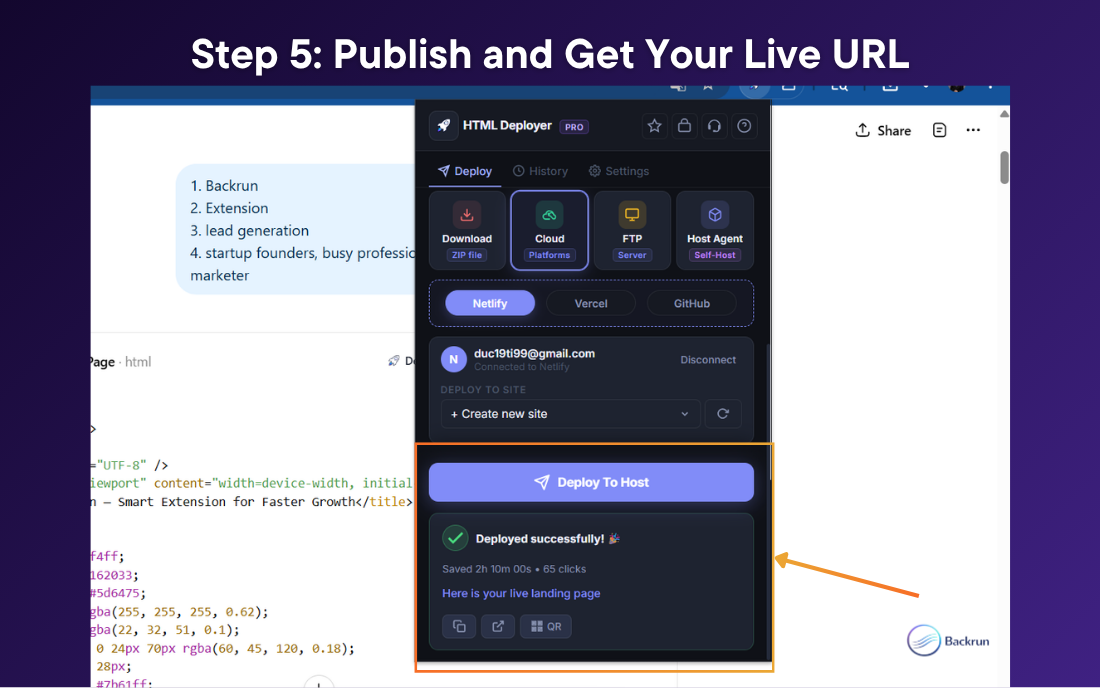
Your landing page is now live. Anyone with the link can visit it.
Here's an example page built with this exact workflow: https://backrun-smart-extension-for-faster-growth.netlify.app/
What to Do After Your Page Is Live
A live URL is the starting line, not the finish line. Three quick things worth doing right after launch:
Check your headline. The first line carries the most weight. If it's vague, people leave before reading anything else. It should immediately tell visitors what they'll get.
Test on mobile. Open the URL on your phone. The CTA button should be visible without scrolling. Most visitors today are on mobile — if they have to scroll to find the button, many won't.
Add analytics (optional). If you want to track visitors, ask the AI to embed a Google Analytics snippet:
"Add a Google Analytics 4 tracking tag to this HTML file. My measurement ID is G-XXXXXXXX."
Redeploy with HTML Deployer in seconds.
Final Thoughts
Building a landing page used to require a developer or at least a few hours of technical setup.
The workflow above reduces it to a conversation with an AI tool and one click in a browser extension. You describe the page. The AI writes the code. HTML Deployer puts it online.
The entire process happens inside the browser tab you already have open — no terminal, no hosting configuration, no new tools to learn.
If you have been putting off building a landing page because it felt too technical, this is the simplest way to get it done today.
Join Quy on Peerlist!
Join amazing folks like Quy and thousands of other builders on Peerlist.
1
4
3