Everything You Need to Know About React 19
Server components and actions are stable; useFormStatus, useActionState, and useOptimistic hooks introduced, goodbye forwardRef, and hello more reabable hydration errors
Kaushal Joshi
Feb 13, 2025 • 14 min read
The long-awaited stable release of React 19 was finally out last week! While the Release Candidate was made public in April, the React team took quite a while to release a stable version.
In this blog, let's explore these new features and improvements in React 19. If you are using Next.js, you must already be familiar with many features and improvements React offers in its latest version.
React 19 - In a Nutshell
React 19 introduced so many things to the library. Some of them were already a part of the Canary release, some were not. Before we dive deep into each new feature, hook, and improvement; let's just quickly glance over everything that React 19 has to offer.
React uses server components by default. Use
"use client"at the top of the file to render a component on the client side.React introduced Actions, functions that handle async transitions in your code.
New hooks: useFormStatus, useActionState, useOptimistic, and use.
Pass ref down to child components without using
forwardRef.No need to use
<Provider>while wrapping a component with context to provide values.Hydration errors are so much better.
Refs support cleanup functions.
useDeferredValue accepts an initial value.
Now you can add document metadata directly to your components.
That being said, let's dive deep into each improvement.
Server Components by Default
With this stable release of React 19, server components, server actions are completely stable. By default, all React components are server components.
Server components completely run on the server. That means you can...
Fetch data directly within the component with
asyncandawait. You don't need to rely onuseEffecthook anymore.Perform backend operations like database queries, and authentication, directly inside the functional component.
Send only the final HTML markup to the client, reducing client-side rendering overload.
Here's an example:
export default async function ReadersList() {
  const res = await fetch('/api/readers');
  const data = await res.json();

  return (
    <p>You have {data.length} readers</p>
  )
}
See how we used async and await in a functional component, and fetched data directly without any hook or external library! When data is fetched, the plain HTML will be sent to the client.
This shift ensures that components run exclusively on the server, significantly improving performance and simplifying logic that previously required backend API integration.
If you want to use client components, you must add "use client" at the start of the file.
Actions - New Way for Data Mutation
Another big feature released with React 19 is Actions. Actions are functions that handle async transitions in your code. Actions make handling async transitions without managing multiple states for loading, errors, etc.
We all know this hassle.
function UpdateName({}) {
  const [name, setName] = useState("");
  const [error, setError] = useState(null);
  const [isPending, setIsPending] = useState(false);

  const handleSubmit = async () => {
    setIsPending(true);
    const error = await updateName(name);
    setIsPending(false);
    if (error) {
      setError(error);
      return;
    }
    redirect("/path");
  };

  return (
    <div>
      <input value={name} onChange={(event) => setName(event.target.value)} />
      <button onClick={handleSubmit} disabled={isPending}>
        Update
      </button>
      {error && <p>{error}</p>}
    </div>
  );
}
With React 19, you can utilize async functions to handle transitions automatically. For instance, useTransition to handle the pending state for you.
function UpdateName({}) {
  const [name, setName] = useState("");
  const [error, setError] = useState(null);
  const [isPending, startTransition] = useTransition();

  const handleSubmit = () => {
    startTransition(async () => {
      const error = await updateName(name);
      if (error) {
        setError(error);
        return;
      }
      redirect("/path");
    })
  };

  return (
    <div>
      <input value={name} onChange={(event) => setName(event.target.value)} />
      <button onClick={handleSubmit} disabled={isPending}>
        Update
      </button>
      {error && <p>{error}</p>}
    </div>
  );
}
Let's understand this snippet:
isPendingwill automatically be set totrueas soon as the transition starts.The async request will be made and
isPendingwill befalseafter the transition.
Actions for form submissions
Actions make handling forms very effortless. You can pass the action directly to the action attribute of the <form> element. Although browsers don't support this natively, React internally makes it work smoothly.
"use client"

import { submitEmail } from "@/actions/subscriptions"

export default function GetUserEmail() {
  return (
    <form action={submitEmail}>
      <label htmlFor="email">Subscribe to our newsletter</label>
      <input id="email" type="email" placeholder="[email protected]" name="email" required />

      <button type="submit">Subscribe</button>
    </form>
  )
}
There are some new things, let's understand:
"use client"will make sure that this file is executed only on the client side.The action
submitEmailis imported from the server. We'll write this function later.submitEmailis added to theactionattribute of the form. Also, the input hasnameproperty set toemail.
The action looks like this:
"use server"

export async function submitEmail(formData: FormData) {
  const email = formData.get("email") as string;

  await prisma.readers.create({
    data: { email }
  })
}
Let's understand this snippet:
"use server"at the top declares all functions from this file as server actions. That means they'd only run on the server.The
submitEmail()takes form data as an argument. it retrieves email by using the.get()method of form data. Remember we addednameproperty to the input element in the previous snippet? The same value will be used to retrieve the data.Backend operations would be performed here. In this case, we are adding the email to the database.
See, it's that simple!
You don't need to call a function on onSubmit() event, nor do you have to add e.preventDefault() at the start of your function. The action receives form data as an argument so you can easily extract data.
Cherry on top, it works both synchronously and asynchronously, without requiring any server-side framework, as this is a completely client-side feature!
New Hook: useFormStatus
React provides two new hooks to further enhance form handling. The first hook is useFormStatus. This hook provides the status of the form to the components nested inside the form element.
Suppose you have written a separate button component that handles form submission. Ideally, it should be disabled when the form is submitting the data. Previously you'd achieve this by creating a state inside the parent component and passing it down to the bottom. With the new hook, you can do the following:
"use client"
import { useFormStatus } from "react";

export default function SubmitButton() {
  const { pending } = useFormStatus();

  return (
    <button type="submit" disabled={pending}>Submit</button>
  )
}
The useFormStatus hook will automatically provide the state of the form the component is a part of. It returns an object with the following properties:
pending: It's a boolean which istrueif the parent<form>is pending submission. Otherwise, it'sfalse.data: An object containing data being submitted by the parent<form>element.method: A string value with two possible values:getorpost.action: A reference to the function passed to theactionattribute to the parent<form>element.
You can find the detailed information about this hook in official documentation.
New Hook: useActionState
This hook makes working with Actions easier. It allows you to update the state of the component based on the result of the form action. It takes three parameters:
action: This is the Action we discussed in the previous section.initialState: The initial value of the state. This has to be a serializable value.paramlink: An optional string containing a unique page URL that the action modifies.
It returns an array with the following values:
state: The current state of the form/component.action: The Action that you can use inside the component (e.g.actionattribute)isPending: A boolean to describe the state of the transition.
We can modify the form we created in Actions for form submissions section and use useActionState instead.
"use client"
import { useActionState} from "react";

import { submitEmail } from "@/actions/subscriptions"

export default function GetUserEmail() {
  const [state, action, isPending] = useActionState(submitEmail, {
    success: true, error: null, data: { email: ""}
  });

  return (
    <form action={action}>
      <label htmlFor="email">Subscribe to our newsletter</label>
      <input id="email" type="email" value={state.data.email} placeholder="[email protected]" name="email" required disabled={isPending} />

      <button type="submit" disabled={isPending}>Subscribe</button>
      { state.error && <p>{state.error}</p>}
    </form>
  )
}
Let's dissect this code:
We passed the
submitEmailaction along with the initial state to theuseActionStatehook.The initial state is modified, and also has
status(boolean) anderror(null or boolean) to manage form's state.We retrieved three values, and used them in the
<form>component.
Here, you can omit success and error in the initial value and just set what's necessary. I find this approach better, so I decided to go with this.
We must change the action as well.
"use server"

export async function submitEmail(prevState: unknown, formData: FormData) {
  // Backend operations

  return {
    success: true,
    error: false,
    data: { email }
  }
}
The most notable change here is that the action now takes two arguments:
prevStateandformData. TheprevStateargument just tracks what was sent in the previous trigger.After function execution, we send the appropriate result.
I have used this in one of my Next.js projects, and I am very impressed by how simple it is to implement.
This hook was previously called
useActionStatein the Canary release. It is renamed touseActionStateas it returns the state of the action passed to the hook and not state of any particular form. Read more about it here.
New Hook: useOptimistic
This is another new hook that you can use along with data mutation. Consider a scenario where you send a request to the server and display results accordingly. If you have implemented correct data validation methods, you know that the server will respond with success.
In such case, you can use the useOptimistic hook to display related data on the screen immediately rather than waiting for the server to send data back. If something goes wrong, you can revert later.
It takes two arguments:
state: The value to be returned initially and whenever the action is pendingupdateFunction: The function that takes current state and the optimistic value and returns the optimistic state.
It returns an array of two values:
optimisticState: The resulting optimistic state.setOptimisticState: The function that dispatches the optimistic update.
Here's an example:
function ChangeName({currentName, onUpdateName}) {
  const [optimisticName, setOptimisticName] = useOptimistic(currentName);

  const submitAction = async formData => {
    const newName = formData.get("name");
    setOptimisticName(newName);
    const updatedName = await updateName(newName);
    onUpdateName(updatedName);
  };

  return (
    <form action={submitAction}>
      <p>Your name is: {optimisticName}</p>
      <p>
        <label>Change Name:</label>
        <input
          type="text"
          name="name"
          disabled={currentName !== optimisticName}
        />
      </p>
    </form>
  );
}
The
useOptimistichook will immediately render theoptimisticNamewhile theupdateNamerequest is in progress.When the update finishes or errors, React will automatically switch back to the
currentNamevalue.
New Hook: use
This is a special hook now available with React 19. You must have a special React project setup or need to use a library with a particular code setup to use this correctly.
The use hook allows React to handle async operations directly in the render function. If React encounters a promise, it suspends rendering until the promise resolves.
You can also use this hook on a promise, the idea being, that you can use it to resolve and get a value, rather than using then(), or async await. and you can wrap that component using <Suspense> and react will show the fallback until that promise is resolved. this makes it easier to manage the loading state.
import { use, Suspense } from "react";

async function fetchAllReaders() {
  const res = await fetch('/api/readers');
  const data = await res.json();

  return data;
}

export function ReadersList() {
  const readers = use(fetchAllReaders);

  return (...)
}

export default function App() {
  return (
      <Suspense fallback={<p>Loading...</p>}>
        <ReadersList />
      </Suspense>
   )
}
The above snippet fetches a list of readers from the API.
The
use()hook consumes the promise, and React suspends the rendering process.The fallback from the
<Suspense>is rendered on the screen until the promise is resolved.Once the promise is resolved, the content inside
<ReadersList />is rendered.
The `use` hook for consuming contexts
You can also use this hook to consume contexts.
import { use } from "react";
import { ThemeContext } from "@/context"

export default function App() {
  const theme = use(ThemeContext)

  return (
    <main className={theme}>
      ...
    </main>
  )
}
Although it's a hook, it's not exactly a hook in traditional React sense. For example, you can call this hook conditionally, unlike any other hook.
There are still some uncertainties on the exact use cases of this hook. As it is more focused on library authors, you'd hardly find yourself using it in your projects.
Improvements With React 19
There are several improvements with React 19 that we cannot ignore. Let's have a glance at them in this section.
Goodbye, forwardRef
A few weeks back, I wrote an article about forwardRef. In the article, I discussed many pain points of forwarding refs from one component to its child component.
React 19 finally eliminated the need to use forwardRef to forward refs. Now you can access ref directly as a prop in functional components.
function Button({ ref, ...props }) {
  return <button ref={ref} {...props} />;
}
React team will soon release a codemod that automatically updates components to use the latest ref prop. Although you can still use forwardRef for now, React plans to deprecate and remove it in future releases.
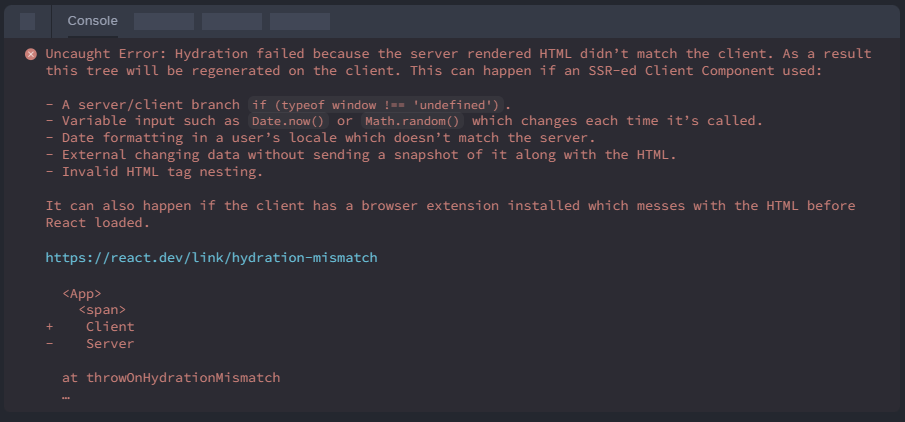
Hydration errors are easy to read
Another great improvement with React 19 that I am personally very excited for. Finally, it's easier to understand and debug hydration errors. React will now provide a detailed message about the mismatch between client and server rather than sending complex jargon that made me break my monitor and start farming.
This would save countless hours trying to debug SSR mismatches.
No need to add Provider to provide context
Another quality-of-life improvement React introduced is that you don't have to use .Provider while providing the context to render child components.
const ThemeContext = createContext('');

function App({children}) {
  return (
    <ThemeContext value="dark">
      {children}
    </ThemeContext>
  );
}
React team is working on publishing a codemod for converting existing providers. In future versions, <Context.Provider> will be deprecated.
Refs can return a cleanup function
React 19 now supports cleanup functions for refs. This would make it simpler to manage what happens when an element with ref is removed from the DOM.
<input ref={(ref) => {
  return () => {
    // ref cleanup function
  }
}})
useDeferredValue now accepts an initial value
The useDeferredValue hook now supports the initial value so you can specify what gets shown before the value arises.
function Search({ deferredValue }) {
	const value = useDeferredValue(deferrvedValue, "");
	return (
		<Results query={value} />
	)
}
When initialValue is provided, useDeferredValue will return it as value for the initial render of the component, and schedules a re-render in the background with the deferred value returned.
Add document metadata directly to your components
You can add HTML metadata like title, meta, link, etc. directly within your components. React will figure out how to use them in the <head> tag for you. That means, you can define the page title, author, and stylesheet, right where you use them and React ensures they appear in the correct place.
function BlogPost({post}) {
  return (
    <article>
      <h1>{post.title}</h1>
      <title>{post.title}</title>
      <meta name="author" content="Kaushal Joshi" />
      <link href="https://peerlist.io/kaushal/" />
      <meta name="keywords" content={post.keywords} />
      <p>
        Hope is the weapon; survival is the victory!
      </p>
    </article>
  );
}
React Compiler
React team also recently introduced a new compiler, that aims to optimize the performance of the app in itself without requiring you to use hooks like useMemo or useCallback. Although it's not officially part of React 19, the React Compiler only supports React 19 for now.
I'd be publishing a blog around React Compiler very soon. So make sure you follow me on Peerlist to have it on your Peerlist feed right when I publish it.
Wrapping up!
That's React 19 for you! With the latest release, React has cleared its direction toward server components, while adding a bunch of new hooks that'd make data mutilation and async transitions much simpler and effective.
Personally, I loved what the React team has cooked and shipped with React 19. I hope to see more libraries and frameworks start supporting this soon. What do you think? Have you tried React 19 yet? What were your initial thoughts? I'd love to know. I am most active on Twitter and Peerlist if you want to say hi!
And by the way, if you are looking for a new job or a community where you want to share and explore cool projects; check out Peerlist!