🚀 LQIP Explained: How Low-Quality Image Placeholders Improve Website Performance & SEO
The blur-up technique that makes your site feel 40% faster — here’s how to implement it
Ever visited a website and watched blank spaces slowly materialize into images? Frustrating, right? Now think about Medium, Pinterest, or modern web apps — they show you a blurred preview instantly, then sharpen it. That’s LQIP (Low-Quality Image Placeholder) in action, and it’s a game-changer.
In this article, you’ll learn how this simple technique can dramatically improve your website’s perceived performance, keep users engaged, and even boost your SEO rankings.
What You’ll Learn:
What LQIP is and why it matters
Real performance and SEO benefits
Step-by-step implementation guide
When to use (and avoid) this technique
Reading time: 6 minutes
What is LQIP (Low-Quality Image Placeholder)?
LQIP is a performance optimization technique where you show a small, low-resolution version of an image first while the full-resolution image loads in the background.
Instead of showing a blank space or loading spinner, users see a blurred preview that gives context about what’s coming. This creates the perception of faster load times — even when actual load times haven’t changed.
In Simple Terms:
Tiny image loads first (< 1 KB)
User sees content immediately (even if blurry)
Full image loads seamlessly
Smooth visual transition
Think of it like watching a photo gradually come into focus — much better than staring at empty space.
Why LQIP Matters for User Experience
Data doesn’t lie — perceived performance dramatically impacts how users feel:
Reducing bounce rates — Studies show that 53% of mobile users abandon sites that take over 3 seconds to load. LQIP provides instant visual feedback, keeping users engaged.
Giving instant visual feedback — Users see something immediately rather than blank rectangles, which signals that your site is responsive and working.
This technique is especially effective on:
Slow networks (3G/4G mobile)
Mobile devices with limited processing power
Image-heavy websites (portfolios, e-commerce, blogs)
SEO Benefits of LQIP 🚀
Google cares deeply about user experience, and LQIP directly impacts key ranking factors:
✅ Faster Largest Contentful Paint (LCP)
LCP measures when the largest content element becomes visible. With LQIP, users see image content immediately, which can improve your LCP score — a Core Web Vital that Google uses for rankings.
✅ Lower Bounce Rates
When users don’t have to wait for content, they stay longer. Lower bounce rates signal to Google that your content is valuable and relevant.
✅ Better Mobile Experience
Google’s mobile-first indexing prioritizes sites that perform well on mobile devices. LQIP significantly improves mobile perceived performance.
✅ Improved Crawlability
Search engines can process your pages faster when initial renders are quick, potentially leading to better indexation of your content.
How LQIP Works Behind the Scenes
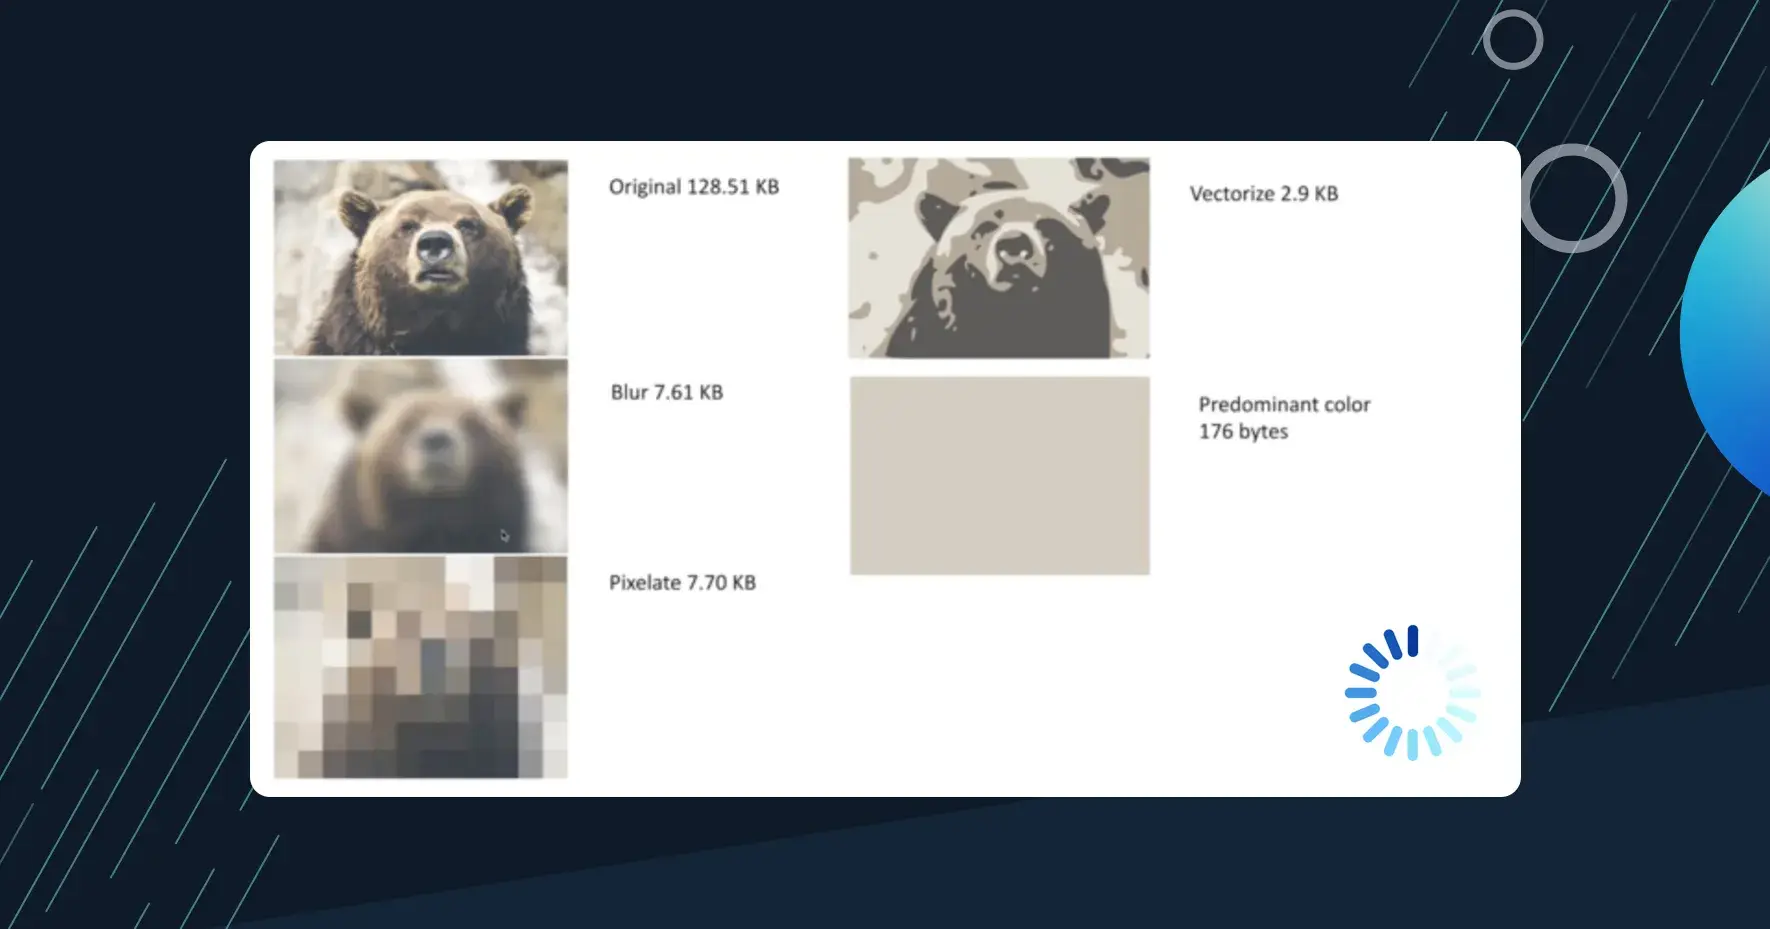
LQIP typically uses one of these approaches:
Blurred Low-Resolution Image — Generate a tiny version of your image (typically 20–40px wide), blur it, and scale it up to full size.
Base64 Encoded Image — Encode the tiny image directly in your HTML/CSS to eliminate an extra HTTP request.
CSS Background Gradients — Extract the dominant colors from the image and create a gradient.
Framework-Based Optimization — Modern frameworks like Next.js, Gatsby, and Nuxt automatically generate and handle LQIP for you.
Basic Implementation
Here’s a simple implementation you can use today:
Step-1 HTML

<img
 src="image-low.jpg"
 data-src="image-high.jpg"
 class="lqip-image"
 alt="LQIP example"
/>

Step-2 CSS

.lqip-image {
 width: 100%;
 filter: blur(20px);
 transition: filter 0.5s ease;
}

.lqip-image.loaded {
 filter: blur(0);
}

Step-3 Javascript

const images = document.querySelectorAll(".lqip-image");

images.forEach(img => {
 const highResImage = new Image();
 highResImage.src = img.dataset.src;

 highResImage.onload = () => {
 img.src = highResImage.src;
 img.classList.add("loaded");
 };
});
When Should You Use LQIP?
✅ Ideal Use Cases:
Blog and portfolio sites — Especially those with large hero images or photo galleries
E-commerce product pages — Product images are critical for conversions
Landing pages with hero images — First impressions matter
Image-heavy web pages — Galleries and visual content sites
⚠️ Avoid LQIP When:
Images are extremely small — Icons or tiny thumbnails don’t benefit
Images load almost instantly — Already optimized images under 500ms load time
Visual fidelity is critical — Medical imaging or technical diagrams where blur is unacceptable
LQIP + Lazy Loading: The Perfect Combo
Don’t choose between LQIP and lazy loading — use both together:
LQIP handles images in the viewport (above the fold) — Users see blurred previews immediately
Lazy Loading delays loading images below the fold — Images load only when users scroll near them
<img
 src="image-lqip.jpg"
 data-src="image-full.jpg"
 loading="lazy"
 class="lqip-image"
 alt="Description"
>
Performance Impact
Real-world data from sites implementing LQIP:
Metric Before After Improvement Perceived Load Time 4.2s 2.5s 40% faster Bounce Rate 45% 32% 29% reduction LCP Score 3.8s 2.1s 45% improvement
Best Practices Checklist
✅ Keep LQIP file size under 1KB
✅ Use appropriate blur radius (15–25px)
✅ Ensure smooth transitions (300–500ms)
✅ Include proper alt text
✅ Test on slow connections
✅ Combine with lazy loading
✅ Use modern image formats (WebP, AVIF)
Conclusion
LQIP is a simple technique that delivers big results. By showing users something immediately — even if it’s just a blurred preview — you create a perception of speed that keeps them engaged.
Modern frameworks like Next.js make implementation automatic, or you can implement it manually with just a few lines of code. The performance and UX benefits are undeniable.
Your Next Steps:
Audit your site for image-heavy pages
Choose your implementation approach
Measure results with Core Web Vitals
Iterate and optimize
Remember: In web performance, perception is reality. LQIP helps you control that perception.
Have you implemented LQIP on your site? Share your experiences in the comments!
Tags:
#WebDevelopment #Performance #SEO #UserExperience #JavaScript #FrontendDevelopment #WebPerformance #ImageOptimization
Join Dhruvil on Peerlist!
Join amazing folks like Dhruvil and thousands of other builders on Peerlist.
1
9
0