One Prompt. A live blog and a ready email campaign.
Kill two birds with one stone?
"Write Once, Run Anywhere" a popular slogan used to describe the cross-platform benefits of the Java programming language. It's one of the most popular taglines in the coding world.
But something like this was not exactly possible for content marketing I suppose, if you have a news piece that needs to be published on a blog, addressed on a newsletter and an instagram post... imagine the number of tab switching and editorial changes.
Here comes Claude desktop, where you can write a blog once, ask it to refine it, make drafts with relevant content for a newsletter & a blog post and publish it on webflow / wordpress / your tech stack.
Here's a flow that one can try replicating within 5 minutes, given that you have
- the actual content
- a webflow account
- an autosend account
- webflow and autosend MCPs connected to your claude setup via connectors:
Paste draft into Claude
↓
Ask Claude to Polish & Generate slug / SEO fields / excerpt + approve edits
↓
Ask Claude to Create Webflow draft CMS item ← (Webflow MCP)
Ask Claude to Create Autosend campaign ← (Autosend MCP)
→ pick subject line
→ suppression group assigned
→ recency check done
↓
Webflow item goes live once approved
→ URL confirmed?
Autosend draft updated with the above live URL
↓
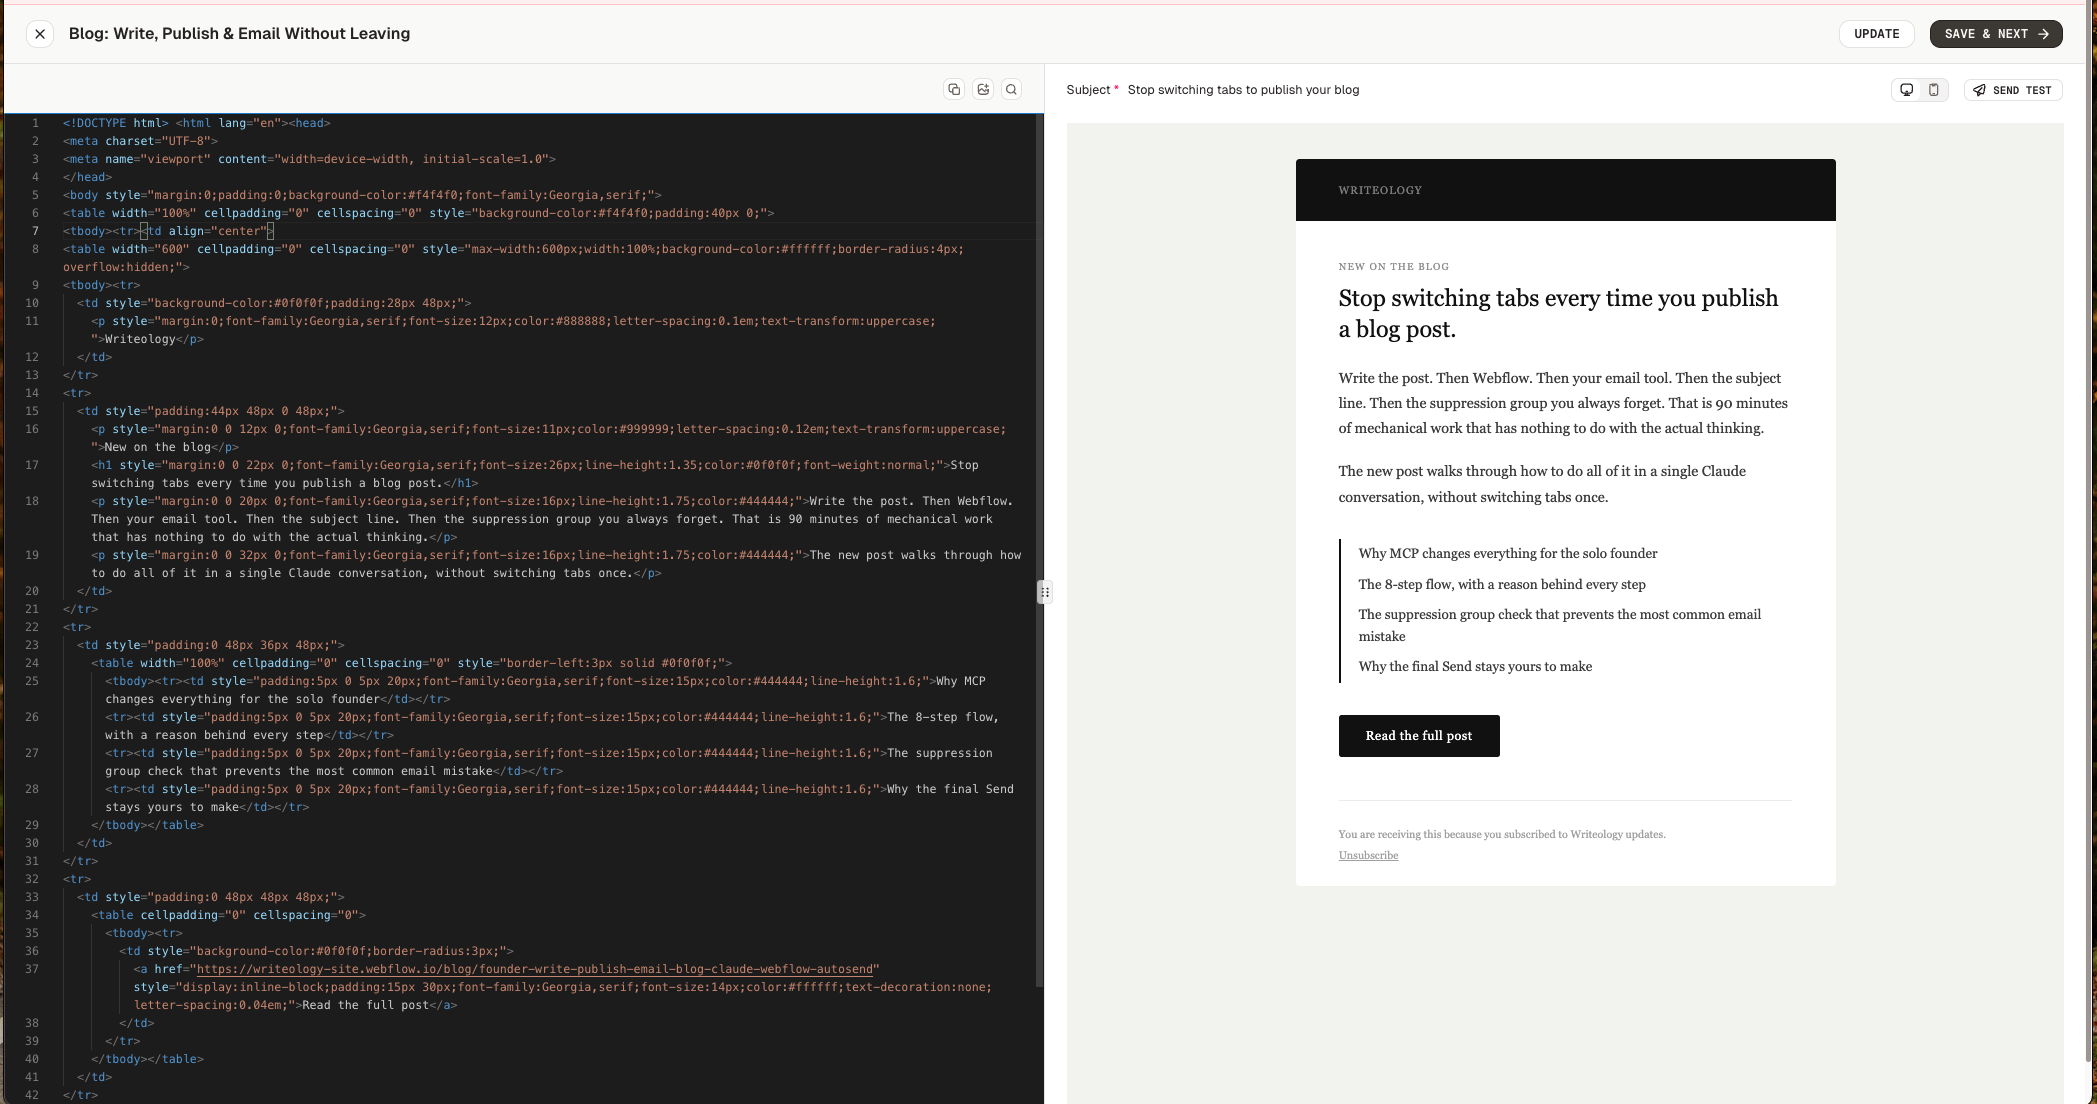
You hop onto Autosend dashboard to hit Send ✅ In fact, I previously brainstormed this particular flow with claude itself and asked it to blog the same and create a campaign on autosend.
It gave me
a draft and published it on my webflow testing site here: https://writeology-site.webflow.io/blog/founder-write-publish-email-blog-claude-webflow-autosend
a draft on autosend where the lists and unsubscribe groups were pre-selected (since claude took the call on which one to choose based on the content). All I had to do was verify the right links and content were there and hit send. Here's the preview it generated:
Flat 10 minutes max.
Imagine doing the same where you have to do the mundane tasks like adding UTMs to the URLs, making HTML templates for the email which is appropriate to the color scheme of the site (which is a huge time consumer in itself), making sure the right group of people are receiving this email (suppression groups / segments)... the list goes on.
Here's a skills file that can be used by your claude environment
---
name: autosend-webflow-publishing
description: Publishing a webflow blog post and creating an autosend campaign
---
---
name: webflow-autosend-blog-publisher
description: >
Use this skill whenever a user wants to write, review, or polish a blog post and then publish it
to Webflow and/or create an email campaign in Autosend. Triggers on any combination of: "publish
my blog", "set up an email campaign for this post", "review and publish", "draft a campaign in
Autosend", "push to Webflow", or when the user pastes a blog draft and wants it distributed.
Also use this skill when the user asks to create a campaign in Autosend from any content — the
campaign creation rules here are critical and must be followed exactly.
---
# Webflow + Autosend Blog Publisher
This skill enables a founder or marketer to go from a raw blog draft to a live Webflow post and
a ready-to-send Autosend email campaign — entirely inside one Claude conversation.
---
## Required MCP Connectors
Both must be connected in Claude Desktop via **Customize → Connectors** before starting:
- **Webflow** — OAuth via the Webflow connector (built-in)
- **Autosend** — OAuth via custom connector at `https://mcp.autosend.com/`
---
## The Full Flow
### Step 1 — Polish the blog draft
Ask the user to paste their draft. Then:
- Tighten the intro, fix grammar, improve flow
- Keep the author's voice — don't over-sanitise
- Show the revised version and **wait for explicit approval** before proceeding
### Step 2 — Generate publishing metadata
Once the draft is approved, generate all four of these in one go:
- **URL slug** — lowercase, hyphenated, no special characters
- **SEO meta title** — under 60 characters
- **SEO meta description** — under 155 characters
- **Excerpt** — 1-2 sentences for the blog listing page
**Image fields check** — When fetching the collection schema (Step 3), inspect the fields for any
`Image` or `MultiImage` type fields (e.g. `blog-post-featured-image-photo`,
`blog-post-thumbnail-image-photo`). If any exist, ask the user at this step to supply image URLs
for each one before creating the draft. Do not skip this — missing images leave the post looking
broken on the listing page. If the user has no image ready, note which fields will be empty and
proceed only after they confirm that is acceptable.
### Step 3 — Create the Webflow CMS draft
Call `data_cms_tool` → `get_collection_list` to find the blog collection, then
`create_collection_items` with `isDraft: true`.
Fields to populate:
- `name` (title)
- `slug`
- `blog-post-richt-text` (rich text body)
- `blog-post-excerpt`
Do **not** publish yet. Confirm the draft was created and show the item ID.
### Step 4 — Pre-flight checks on Autosend
Before creating anything in Autosend, call all three of these:
- `get_lists_and_segments` — find the right audience
- `list_senders` — confirm a verified sender exists
- `list_suppression_groups` — find the right unsubscribe group
Also call `list_campaigns` to check when the last campaign was sent to the target list.
Surface this to the user — if a campaign went out in the last 3 days, flag it and ask if they
want to proceed.
### Step 5 — Pick a subject line
Generate exactly **3 subject line options**:
1. Curiosity-driven
2. Benefit-led
3. Direct / plain
Present them and wait for the user to pick one before creating the campaign.
### Step 5b — UTM parameters
After the subject line is chosen, ask the user if they want UTM parameters appended to the
blog post CTA link in the email. This is optional but recommended for tracking.
If yes, collect the following (suggest sensible defaults in brackets):
- `utm_source` — e.g. `autosend`
- `utm_medium` — e.g. `email`
- `utm_campaign` — e.g. a slug derived from the blog title
- `utm_content` — e.g. `cta-button` (optional, for A/B tracking)
Construct the full URL with parameters appended before writing the campaign HTML:
`https://yoursite.com/blog/your-slug?utm_source=autosend&utm_medium=email&utm_campaign=...`
If the user says no, use the plain blog URL with no UTM parameters.
### Step 6 — Create the Autosend campaign
See the **Critical: Autosend Campaign Creation** section below. This step has specific rules
that must be followed precisely.
### Step 7 — Publish Webflow item on user go-ahead
When the user says "publish" or "looks good" or any equivalent go-ahead phrase **without
having explicitly reviewed the Webflow preview link first**, pause and confirm the following
before publishing:
1. **Slug** — Show the slug that will be used and confirm it is correct. Flag any that look
auto-generated or potentially wrong.
2. **Images** — If the CMS schema has image fields, list each one and its current value
(populated URL or empty). If any are empty, ask the user if they want to add images before
going live. Do not proceed past this check until the user explicitly confirms.
Only after the user re-confirms ("yes, looks good", "proceed", "go ahead", etc.) should you:
1. Call `publish_collection_items` with the item ID from Step 3
2. Call `publish_site` with `publishToWebflowSubdomain: true` and `customDomains: []`
3. Confirm the live URL back to the user
### Step 8 — Verify CTA link
Compare the live Webflow URL against the CTA href in the Autosend campaign HTML.
If they don't match, flag it. Do not proceed until they match.
### Step 9 — Hand off to user
Tell the user:
- Webflow post is live at [URL]
- Autosend campaign draft is ready at [dashboardUrl]
- The only remaining step is to hit **Send** from the Autosend dashboard
---
## Critical: Autosend Campaign Creation
This is the most important part of the skill. Follow these rules exactly — deviating from them
causes API failures.
### Use `create_campaign`, never `create_template` for campaigns
`create_template` is meant for creating a template via the API. Always use `create_campaign` to create a sendable campaign draft.
### HTML content rules — follow all of these
Autosend's campaign creation internally creates a template from the HTML. If the HTML contains
certain characters, this step fails silently with `TEMPLATE_CREATION_FAILED`. To prevent this:
- **No special arrow characters** — do not use `→`, `←`, `↑`, `↓` or any Unicode arrows.
Use plain text like `->` (HTML entity) or just write "Read more" instead.
- **No curly/smart apostrophes or quotes** — use straight apostrophes `'` and straight
quotes `"` only. "You're" should be written as `You're` not `You’re` in the raw HTML.
- **Always include `{{unsubscribe}}`** — this is a reserved Autosend variable that gets replaced
with the real unsubscribe URL at send time. Every campaign HTML must contain:
`<a href="{{unsubscribe}}">Unsubscribe</a>`
- **Use HTML entities for special symbols** — arrows: `→` works. Dashes: use `-`.
Avoid copy-pasting from rich text editors that inject Unicode characters.
- **Table-based layout** — use standard email-safe HTML: tables, inline CSS, no external
stylesheets, no CSS grid or flexbox.
### Required fields for `create_campaign`
```
campaignName string — descriptive name, max 200 chars
subject string — the chosen subject line, max 988 chars
htmlContent string — full email HTML (see rules above)
fromSenderId string — use ID from list_senders
toLists array — list/segment IDs from get_lists_and_segments
unsubscribeGroupId string — use the groupId field (e.g. "Q4JEY"), NOT the id field
trackingOpen true
trackingClick true
previewText string — max 140 chars
```
### Use `groupId` not `id` for suppression groups
`list_suppression_groups` returns two ID fields per group:
- `id` — the internal Mongo ID (e.g. `68eXXXXeXXXXXXXXXXXXXX1`) — **do not use this**
- `groupId` — the short code (e.g. `Q4XXX`) — **use this as `unsubscribeGroupId`**
### Always return the dashboardUrl
`create_campaign` returns a `dashboardUrl`. Always include this in the response so the user
can click straight through to review and send the campaign.
### If `create_campaign` fails
1. Check the HTML for Unicode arrows or smart quotes — strip them all
2. Verify `unsubscribeGroupId` is using the short `groupId` field
3. Verify `fromSenderId` exists in `list_senders`
4. Trim down the subject line
5. If still failing, report the `request_id` from the error to Autosend support
---
## Email HTML Template (Safe Starter)
Use this as a base. It is confirmed to work with Autosend's campaign creation:
```html
<!DOCTYPE html>
<html lang="en">
<head>
<meta charset="UTF-8"/>
<meta name="viewport" content="width=device-width, initial-scale=1.0"/>
</head>
<body style="margin:0;padding:0;background-color:#f4f4f0;font-family:Georgia,serif;">
<table width="100%" cellpadding="0" cellspacing="0" style="background-color:#f4f4f0;padding:40px 0;">
<tr><td align="center">
<table width="600" cellpadding="0" cellspacing="0" style="max-width:600px;width:100%;background-color:#ffffff;border-radius:4px;overflow:hidden;">
<!-- Header -->
<tr>
<td style="background-color:#0f0f0f;padding:28px 48px;">
<p style="margin:0;font-family:Georgia,serif;font-size:12px;color:#888888;letter-spacing:0.1em;text-transform:uppercase;">Your Brand Name</p>
</td>
</tr>
<!-- Body -->
<tr>
<td style="padding:44px 48px 0 48px;">
<p style="margin:0 0 12px 0;font-family:Georgia,serif;font-size:11px;color:#999999;letter-spacing:0.12em;text-transform:uppercase;">New on the blog</p>
<h1 style="margin:0 0 22px 0;font-family:Georgia,serif;font-size:26px;line-height:1.35;color:#0f0f0f;font-weight:normal;">Blog title goes here</h1>
<p style="margin:0 0 32px 0;font-family:Georgia,serif;font-size:16px;line-height:1.75;color:#444444;">Short summary of the blog post goes here. Keep it to 2-3 sentences. Goal is one click through to the post.</p>
</td>
</tr>
<!-- CTA -->
<tr>
<td style="padding:0 48px 48px 48px;">
<table cellpadding="0" cellspacing="0">
<tr>
<td style="background-color:#0f0f0f;border-radius:3px;">
<a href="https://yoursite.com/blog/your-slug" style="display:inline-block;padding:15px 30px;font-family:Georgia,serif;font-size:14px;color:#ffffff;text-decoration:none;letter-spacing:0.04em;">Read the full post</a>
</td>
</tr>
</table>
</td>
</tr>
<!-- Divider -->
<tr><td style="padding:0 48px;"><hr style="border:none;border-top:1px solid #eeeeee;margin:0;"/></td></tr>
<!-- Footer -->
<tr>
<td style="padding:28px 48px;">
<p style="margin:0 0 6px 0;font-family:Georgia,serif;font-size:12px;color:#aaaaaa;line-height:1.6;">You are receiving this because you subscribed to our updates.</p>
<p style="margin:0;font-family:Georgia,serif;font-size:12px;color:#aaaaaa;"><a href="{{unsubscribe}}" style="color:#aaaaaa;text-decoration:underline;">Unsubscribe</a></p>
</td>
</tr>
</table>
</td></tr>
</table>
</body>
</html>
```
---
## Safety Rules
- Never publish to Webflow without explicit user confirmation ("publish", "looks good", "go ahead")
- Never send a campaign — only create drafts. The user hits Send from the Autosend dashboard
- Always run the pre-flight suppression and recency checks before creating a campaign
- Always verify the CTA link in the email matches the live Webflow URL after publishingI suggest keeping the last part where you have to hop onto autosend to click send remain being a manual human driven task (even if autosend mcp supports sending a campaign directly). Machines can automate the boring stuff but end decisions should always be a human call in my opinion.
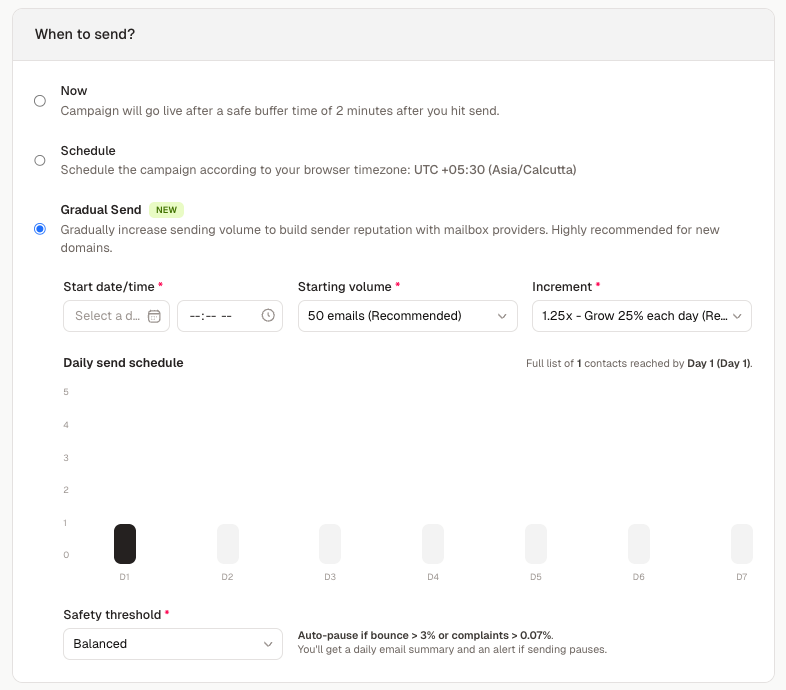
In fact, in this particular instance, it gives you time to think about whether to use the gradual send feature on autosend so that you can take a call on whether you want annoy all 100 users at once or 50 users over 2 days which helps with gmail not marking you as a spammy account.
Do note that the intention here is to use AI as an assistant and not as a thinking replacement, with this whole flow one can get the freedom of writing their thoughts out and then use AI to structure it in a relevant fashion for the business side of things.
Feel free to let me know your thoughts, any additions or edits that can go on the skills file. Hope this blog helped in saving your time 🙌
Credits:
Cover image generated using https://peerlist.io/akshatbuilds/project/og-image-generator
The blog on webflow was entirely written by claude.
This blog (the one you're reading) was written by the author and partly generated using claude for the skills file and the flow description.
The code in the preview of the email on autosend was entirely handled by claude + autosend mcp.
A huge shoutout to the entire autosend team for helping me out with a few doubts when working on this setup.
Join Shreyas on Peerlist!
Join amazing folks like Shreyas and thousands of other builders on Peerlist.
0
5
1