ReAct AI Agents and how to easily build them using Langgraph
Learn what is ReAct and how it is used to build modern AI Agents
ReAct AI Agents and how to easily build them using Langgraph
ReAct Agents
In this rapidly developing world of AI, agents are no longer just responding to prompts, they are Reasoning and Acting. One of the widely used architecture enabling this is the ReAct.
In traditional LLM-based workflows, the model only reasons — it generates answers purely based on its internal knowledge.
However, ReAct agents can also act — they can call external tools (like APIs or databases) to fetch real-time or external information, and then continue reasoning based on that data.
ReAct stands for Reasoning and Action.
Agents built with ReAct can -
act — let the model call a specific tool
observer — pass the output of the tool back to the model
reason — let the model reason about the tool output and decide what to do next, whether to call another tool or just respond directly
ReAct combines the reasoning power of the chat models with its tool calling ability like search engines, databases or your own custom API. The agent with its reasoning power decides which tool to call for the given task/prompt.
The AI doesn’t call the tool directly. It uses its tool calling ability to understand the prompt and returns an output specifying the particular tool it intends to use along with the arguments that are required for the function.
We then call the tool on agent’s behalf and pass the output of the function back to the agent.
The entire flow repeats again. The agents reasons whether to call another tool or to directly respond back with an answer.
ReAct Agent using Langgraph
Let us build a simple ReAct agent with four tools — add, subtract, multiply and divide. The agent will utilize these tools to perform action based on it’s reasoning against a prompt by the user.
What is Langgraph?
Langgraph is an orchestration tool that helps you in build stateful, multi-step AI agents using a graph based approach. Where each node represents a function, model call, or tool and the edges define how data flows between them.

A Simple ReAct Agent
Let’s start building! I expect you are familiar with Langchain and Langgraph a little bit as this tutorial will not cover the depth of the code.
Environment Setup
We’ll build this using python so make sure you have python version greater that 3.11.0
First let’s create a virtual environment and activate it.
python3 -m venv venvActivate the virtual environment
source venv/bin/activateLet’s install the dependencies —
First create a requirements.txt file at the root and past the following —
langgraph
langgraph-prebuilt
langgraph-sdk
langgraph-checkpoint-sqlite
langsmith
langchain-community
langchain-core
langchain-google-genai
notebook
langgraph-cli[inmem]
Then install the dependencies —
pip install -r requirements.txtNow, if you can either use Jupyter notebook or simple .py file.
Adding Gemini API Key
First let’s import the os and getpass module to add GOOGLE_API_KEY for using Gemini Models. You can get your key from here.
import os
import getpass

def _set_env(var: str):
 if not os.environ.get(var):
 os.environ[var] = getpass.getpass(f"{var}: ")

_set_env("GOOGLE_API_KEY")
Now let’s define the tools —
def add(a: int, b: int) -> int:
 """
 Add a and b;
 Arg:
 a: first operand
 b: second operand
 """
 return a + b

def subtract(a: int, b: int) -> int:
 """
 Subtract a and b;
 Arg:
 a: first operand
 b: second operand
 """
 return a - b

def multiply(a: int, b: int) -> int:
 """
 Multiply a and b;
 Arg:
 a: first operand
 b: second operand
 """
 return a * b

def divide(a: int, b: int) -> int:
 """
 Divide a by b;
 Arg:
 a: first operand
 b: second operand
 """
 if b != 0:
 return a / b

 return "Dividing by zero"

tools = [add, subtract, multiply, divide]
Initializing the Chat Model
Now we’ll first define our model and then bind the above tools to it so that the Agent is aware of the available tools.
from langchain_google_genai import ChatGoogleGenerativeAI

llm = ChatGoogleGenerativeAI(model="gemini-2.5-flash")
llm_with_tool = llm.bind_tools(tools)
Starting with Langgraph
We’ll now use Langgraph to perform the future actions. First we will create a state that will manage the conversational history. In Langgraph we can easily do this with the help of MessageState — it is a specialized state type designed to simplify the management of conversational message history within an agent’s state. It automatically includes a messages field, which is a list of message objects (e.g., human messages, AI messages, tool messages). It comes with a built-in reducer that appends new messages to this list as the state updates, eliminating the need for manual state management for message history.
from langgraph.graph import MessagesState

# Node
def assistant(state: MessagesState):
 return {"messages": [llm_with_tool.invoke(state["messages"])]}
In the above code we have defined a function which will act as a node. This is the first node in the graph and when we invoke the graph with user’s message, the assistant function will be called. The function calls the Chat Model and returns a dictionary that contains the response of the Chat Model. Since we are using the MessagesState the response will automatically append in the messages list that we’ll create below. You’ll understand it more clearly once we finish building the graph and start using it.
Building the Graph
from langgraph.graph import StateGraph, START, END
from langgraph.prebuilt import ToolNode, tools_condition
from langgraph.checkpoint.memory import MemorySaver
from IPython.display import Image, display

# So that agent remembers the conversation
memory = MemorySaver()

# Create the builder by instantiating StateGraph
builder = StateGraph(MessagesState)

# We have two nodes one is the Chat model that'll decide whether to respond
# directly or to call a tool
builder.add_node("assistant", assistant)

# The second one is the tool itself
builder.add_node("tools", ToolNode(tools))

# The edges goes from START to the assistant then we conditionally branch
# to either the tool node or directly to the END
# based on the output of the "assistant" node
builder.add_edge(START, "assistant")

# This conditionally branches the graph
# Langgraph has a tools_condition tool that handles routing for us.
# It inspects the last AI message — if the model requested a tool call,
# it automatically routes execution to the tool node
# otherwise, it moves toward completion.
# For eg: If the Model returns a tool call the tools_condition will
# automatically branch to the tools node
builder.add_conditional_edges("assistant", tools_condition)

builder.add_edge("tools", "assistant")
builder.add_edge("assistant", END)

# Compile the graph with a checkpointer so that the AI remebers past conversations
graph = builder.compile(checkpointer=memory)

# Use the below code to display the graph if your are using Jupyter Notebook
# display(Image(graph.get_graph(xray=True).draw_mermaid_png()))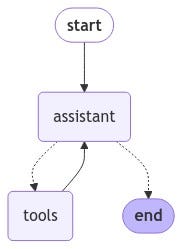
This is how the graph that we built
Creating messages list and Graph invocation
from langchain_core.messages import HumanMessage

# We need to provide a thread_id for memory to work.
# Different thread_id will have different memory
config = {"configurable": {"thread_id": "1"}}

# This is the initial messages list that contains the user's message
messages = [HumanMessage(content="Multiply 96 and 45")]

# When we invoke the graph the "assitant" function will be called
# The outputs by the LLM will automatically get appended in the messages list
messages = graph.invoke({"messages": messages}, config)

# Print the messages after the graph has finished executing
for m in messages['messages']:
 m.pretty_print()
================================ Human Message =================================
Multiply 96 and 45
================================== Ai Message ==================================
Tool Calls:
multiply (b983195f-81cc-41ad-9a3a-a9d4009f177b)
Call ID: b983195f-81cc-41ad-9a3a-a9d4009f177b
Args:
a: 96
b: 45
================================= Tool Message =================================
Name: multiply
4320
================================== Ai Message ==================================
The answer is 4320.This is the output of the above code. Let me walk you through it —
Firstly, when we invoke the graph with the message — “Multiply 96 and 45”. The first node is hit and the Model responds with the “tool calls” and this message is automatically appended to the messages list. Then the graph moves to the “tools” node and the multiply function is executed and similarly the “Tools Message” is appended to the messages list, after that the “tools” node cycles back to the “assistant” node. The Model reasons and understands that all the requirements are made and now it can form the answer, therefore the Model responds with the final answer — “The answer is 4320” and branches to END.
Now lets test the memory of the Agent
Let’s ask it to perform another operation on the result obtained in the previous step.
messages = [HumanMessage("Now divide the result by 10")]
messages = graph.invoke({"messages": messages}, config)

for m in messages['messages']:
 m.pretty_print()
================================ Human Message =================================
Multiply 96 and 45
================================== Ai Message ==================================
Tool Calls:
multiply (b983195f-81cc-41ad-9a3a-a9d4009f177b)
Call ID: b983195f-81cc-41ad-9a3a-a9d4009f177b
Args:
a: 96
b: 45
================================= Tool Message =================================
Name: multiply
4320
================================== Ai Message ==================================
The answer is 4320.
================================ Human Message =================================
Now divide the result by 10
================================== Ai Message ==================================
Tool Calls:
divide (40a803e8-1620-4263-99a9-0801753a31f5)
Call ID: 40a803e8-1620-4263-99a9-0801753a31f5
Args:
...
432.0
================================== Ai Message ==================================
The answer is 432.
Output is truncated. View as a scrollable element or open in a text editor. Adjust cell output settings...As you can see it remembers the past state. Great! You have successfully created a ReAct AI Agent using Langgraph. You can play around with the code and experiment with it. I’ve added the code to github gist, you can get it from here.
Keep building! Keep learning. You can follow me on Linkedin or Twitter. I’ll meet you in the next one. Happy Coding!
Join Sreejit on Peerlist!
Join amazing folks like Sreejit and thousands of other builders on Peerlist.
0
4
0